As many of you already know, you can backup databases to Azure Blob Storage since SQL Server 2012 SP1 CU2. If you check SQL Server 2016 documentation, you would see that there is an additional way of backing up databases to Azure Blob Storage, mainly tied to a different credential type from what is offered previously in SQL Server. Please note that at the time of writing, the SQL Server 2016 referred here is the CTP 2.3.
Essentially to perform database backup to Azure Blob Storage requires 2 main steps: create the credential and do the backup. The type of credential created affects the way the backup statement is written. There are 2 types of credential (for backup) supported depending on the version:
- Using Credential with Storage Access Key. Supported since SQL Server 2012 SP1 CU2.
- Using Credential with SAS Key. Supported in SQL Server 2016.
Summarising The Differences
Although in a glance both may seem very similar, there are a few differences.
With the Storage Access Key based credential:
- You are giving the freedom to run backup to any containers within the storage account.
- There is also no expiry date on this access, until someone regenerates the key for the storage account.
- All the Azure Storage and Access Key details you need are available through Azure Portal. Once you have these you can create the credential and start backing up in T-SQL. See code sample in the next section.
With Shared Access Signature (SAS) key based credential:
- You can limit access to containers only.
- You can expire the shared access policy at the container level.
- You will need to create a container and manage the Shared Access Signature with its Policy, using either PowerShell, C# code or Azure Storage Explorer.
Code Differences
Using Credential with Storage Access Key
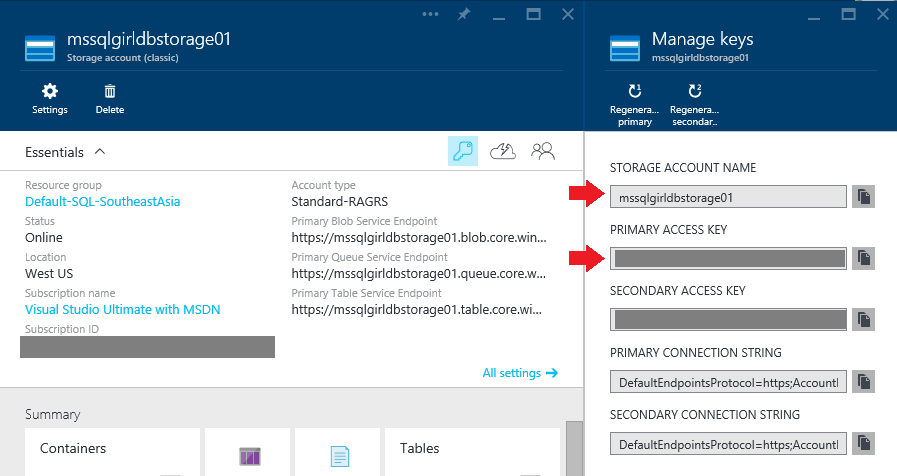
Step 1. You can follow the steps existing tutorial here on how to programmatically obtain the storage account name and the access keys. Or, if you want to use the GUI via the Azure Portal, navigate to the storage account as shown below. In this example, I’m using “mssqlgirldbstorage01” as my storage account and the details in the Primary Access Key field as my storage access key.
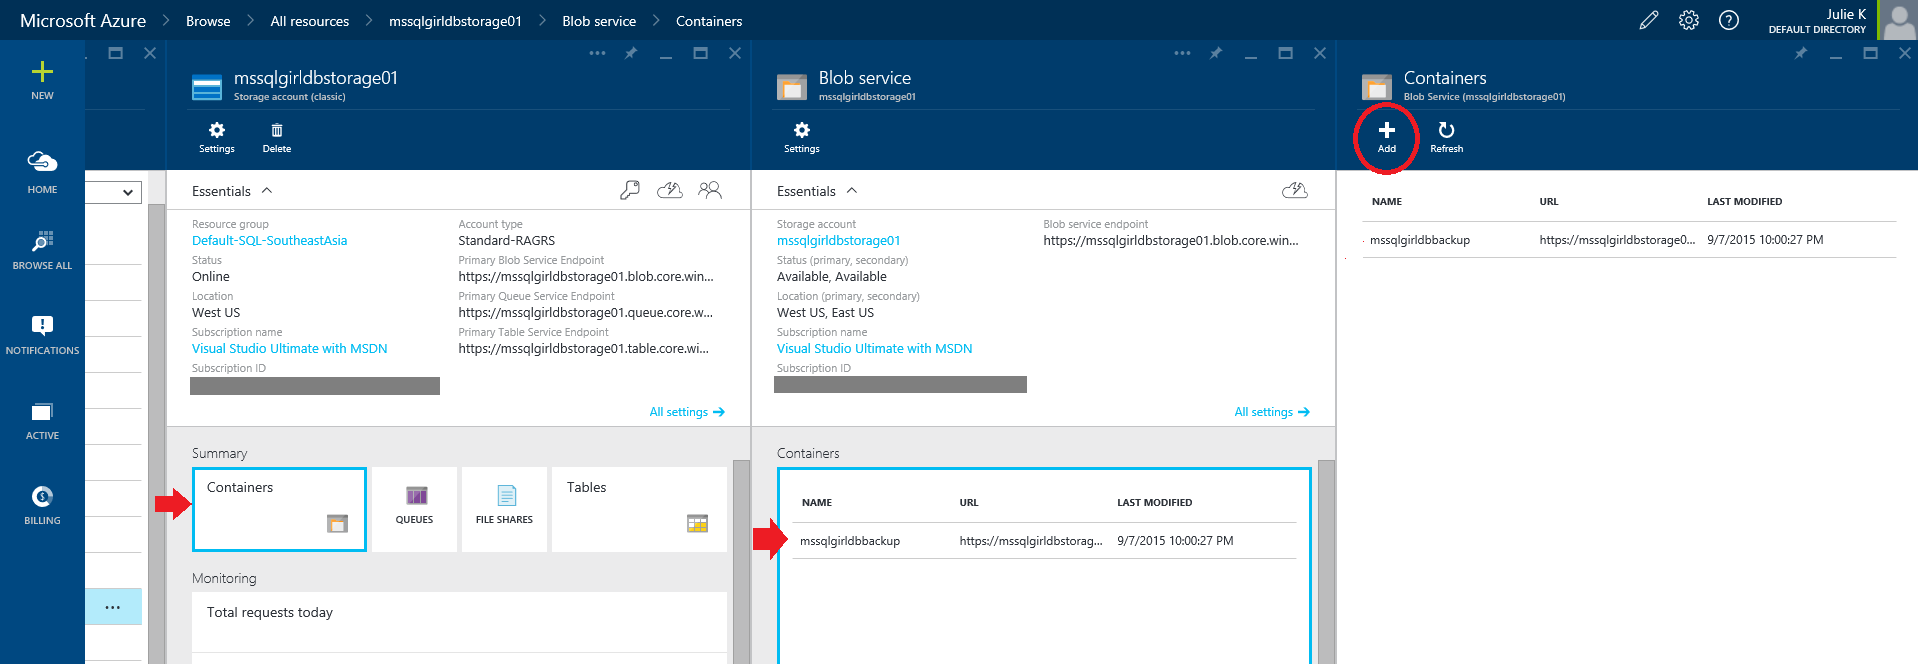
Make sure you have a container, or create one from the portal, as shown below.
Step 2. Using T-SQL, you can create the credential as shown below in your SQL Server 2012 SP1 CU2 or higher instance.
CREATE CREDENTIAL [BackupToAzure]
WITH IDENTITY = 'mssqlgirldbstorage01',
SECRET = 'KKOW2egMenfLg0Y/RyxYm/KKOW2egMenILzJ5tkMTm7/KKOW2egMenOiMCnNileKKKOW2egMen=='
Step 3. Perform backup:
BACKUP DATABASE [AdventureWorks2014]
TO URL ='https://mssqlgirldbstorage01.blob.core.windows.net/mssqlgirldbbackup/AdventureWorks2014.bak'
WITH CREDENTIAL = 'BackupToAzure'
Step 4. Confirm your backup. SSMS should return the following message if the backup is successful:
Processed 24320 pages for database 'AdventureWorks2014', file 'AdventureWorks2014_Data' on file 1.
Processed 2 pages for database 'AdventureWorks2014', file 'AdventureWorks2014_Log' on file 1.
BACKUP DATABASE successfully processed 24322 pages in 11.186 seconds (16.986 MB/sec).
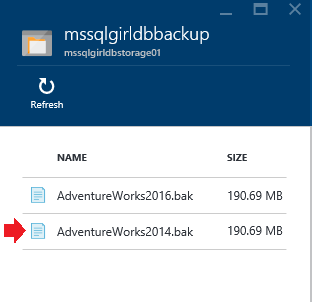
When you navigate to your Container via Azure Portal, you would see AdventureWorks2014.bak file similar to the following.
Using Credential with Shared Access Signature
Step 1. Create the Shared Access Signature and Policy programmatically as per tutorial here. Or create it using Azure Storage Explorer. Steps 1 and 2 are similar to my earlier blog post on SQL Server 2014 In A Jiffy: Credential For Windows Azure Storage
Step 2. Login to your SQL Server 2016 instance and create the credential. Note the differences from the Storage Access Key based whereby the credential name is any name that you wish to assign to it. Whereas here, the credential name is essentially the path to the storage account and uses shared access signature as the SECRET value. Similar to the example above, “mssqlgirldbstorage01” is my storage account name, whilst “mssqlgirldbbackup” is my container name.
CREATE CREDENTIAL [https://mssqlgirldbstorage01.blob.core.windows.net/mssqlgirldbbackup]
WITH IDENTITY = 'SHARED ACCESS SIGNATURE',
SECRET = 'sr=c&si=dbbackup&sig=p6JdPrIRSzbX4LbEsdfkjMp6JdNlmPrIRSzomtueaes%3D'
Step 3. Perform the backup. Again, please note the differences between the BACKUP command here compared to the Storage Access Key based credential.
BACKUP DATABASE [AdventureWorks2016]
TO URL = 'https://mssqlgirldbstorage01.blob.core.windows.net/mssqlgirldbbackup/AdventureWorks2016.bak'
Step 4. Confirm your backup. SSMS should return the following message if the backup is successful:
Processed 24320 pages for database 'AdventureWorks2016', file 'AdventureWorks2016_Data' on file 1.
Processed 2 pages for database 'AdventureWorks2016', file 'AdventureWorks2016_Log' on file 1.
BACKUP DATABASE successfully processed 24322 pages in 11.186 seconds (16.986 MB/sec).
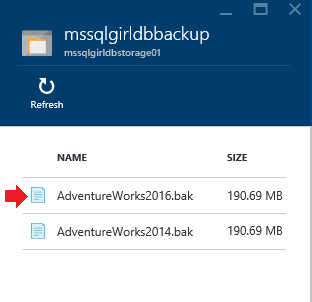
When you navigate to your Container via Azure Portal, you would see AdventureWorks2016.bak file similar to the following.
Credential Statement – Comparison
| Credential Argument | Storage Access Key | Shared Access Signature |
|---|---|---|
| Credential Name | Any values, e.g. [BackupAzure] | Path to Storage Account and Container, e.g. [https://storage.blob.core.windows.net/container] |
| Identity | Storage Account Name, e.g. ‘mssqlgirldbstorage01’ | ‘SHARED ACCESS SIGNATURE’ literal |
| Secret | Either Primary Access Key or Secondary Access Key of the storage | SAS token generated from PowerShell, C# or Azure Storage Explorer |
Backup Statement – Comparison
| Backup Argument | Storage Access Key | Shared Access Signature |
|---|---|---|
| URL | Full path to the URL including storage, container and the intended file name, e.g. ‘https://mssqlgirldbstorage01.blob.core.windows.net/mssqlgirldbbackup’ | |
| Credential | The credential name, e.g. ‘BackupToAzure’ | Not Applicable |
| Secret | Either Primary Access Key or Secondary Access Key of the storage | SAS token generated from PowerShell, C# or Azure Storage Explorer |
Wrap Up
In SQL Server 2012 SP1 CU2 and higher offer a powerful way of backing up database to the cloud on Azure Blob Storage. SQL Server 2016 enhances the capability further with SAS key based credentials. It’s a great idea to understand the differences between them and how to use them. I tend to use GUI while trying out how they work before I jump into PowerShell or C# code to automate things. However, you may be comfortable to program it right away in which case, MSDN has provided plenty of guidelines as shown below.
2 Responses
CREATE DATABASE SCOPED CREDENTIAL myAzureCredential
WITH IDENTITY=’anjbackupstorage’,
SECRET=’L7yiiT8wg9O9CZlT6xwrEp29aID/p5enEjOObSWP4QEcYd2vfkIAWtWp3ZK7ZnJv2hQsMYw9V0nJ9Xp1qLyZGQ==’;
BACKUP DATABASE [finalproject] TO
URL=’https://anjbackupstorage.blob.core.windows.net/sqlbackup/finalproject.bacpac’
WITH CREDENTIAL=’myAzureCredential’ ;
BAckup database is notsupported in this version of sqlplz mail me what to do
Hi Anjum,
Are you trying to create a database backup of Azure SQL Database to a blob storage?
If that’s the case, the following blog posts will be useful to read. Essentially there is no t-sql based backup. However, you can use a free tool to do this.
Azure SQL Database: Built-in Backups vs Import/Export
Backup and restore your SQL Azure database using PowerShell
Let me know how you go.
Julie